How to Design Your Own Preserved Flower Bouquet
Design Your Own Preserved Flower Bouquet
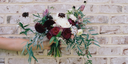
Designing a preserved flower bouquet is equal parts craft and storytelling. With the right mix of feature flowers, fillers & greenery, structural & accent stems, and craft details—from floral wrapping and ribbons & bands to essential floral tools—you can create a bouquet that feels balanced, expressive, and made to last.
1) Start with Feature Flowers (Your Focal Point)
Feature flowers establish the color story, proportion, and mood. Choose main blooms that anchor the eye—e.g., preserved roses for romance and structure, or other statement blooms for tone and volume. Keep a simple ratio like 3–5 focal stems as your core; build everything else around them.
2) Layer Fillers & Greenery for Depth
Fillers and foliage bridge negative space, soften transitions, and add rhythm. Opt for airy textures to create movement and natural spacing. Think wispy sprays, fine leaves, or mountain botanicals that add lightness without overpowering your feature blooms.
Browse preserved & dried fillers & greenery to find textures that complement (not compete with) your focal flowers.
3) Shape with Structural & Accent Stems
Structural stems define silhouette; accent stems punctuate the design. Use elongated or architectural pieces to guide the viewer’s eye (S-curve, triangle, or crescent forms), then place smaller accents to highlight focal blooms and add visual “beats.” This is where modern, classic, or minimalist styles come to life.
Explore structural & accent stems to build form and balance.
4) Finish with Craft Details: Wrap, Ribbon, Presentation
Presentation turns arrangement into gift. Choose wrapping that supports the mood—matte for minimalism, translucent for ethereal softness, pearlescent for ceremony—and add a coordinating ribbon or band to complete the line. Clean finishes rely on the right floral tools (sharp shears, discreet tape/adhesive, card dots) so edges stay crisp and secure.
5) Composition Tips from a Floral Artist
- Choose a shape first: round (classic), cascade (romantic), crescent (editorial), or vertical (modern).
- Work in layers: focal → filler → structure → accents → finishing details.
- Repeat colors intentionally: echo your focal hue 2–3 times in smaller touches for cohesion.
- Mind scale: vary head sizes (large/medium/small) to avoid a flat, single-plane look.
- Leave breathing room: negative space makes premium blooms feel elevated and intentional.
6) Style Inspirations (Try One)
- Modern Minimal: tight color palette, clean lines, one structural gesture, subtle wrap.
- Romantic Classic: round profile, soft fillers, satin ribbon, warm neutrals.
- Editorial Crescent: off-center focal, sweeping structure, translucent wrap, narrow band.
- Scandi Natural: low saturation, airy spacing, linen band, matte papers.
Why Preserved & Dried for DIY?
Preserved and dried flowers let you design without the race against time. They hold shape and texture for years, so you can practice, edit, and perfect at your own pace—ideal for learning design principles and creating keepsakes that endure.
Shop the Essentials
- Feature Flowers (main blooms)
- Fillers & Greenery
- Structural & Accent Stems
- Floral Wrapping & Ribbons & Bands
- Floral Tools
Final Note
Great bouquets are composed, not crowded. Choose a clear shape, commit to a palette, and let your feature flowers lead the story. With the right components and a light touch, every bloom becomes yours.


